Showing posts with label photography. Show all posts

Wednesday, June 22, 2011

A little look into the market


Not really an expert in economics and the world of photography, but I have made some educated observations that are common-sense to me.

The days of the common photographer getting highly paid are over in this digital age.  Photographers had to be more skilled in technical in the days of film with all the processing and the expenses, which is why there were fewer artists around compared to today.  Most photo-blobs and forums will have complaints about how its so hard to make money in the market today due to the mass flooding of photographers because of the availability of inexpensive equipment.

The truth is that yes its harder to make money with the old business model for photography.  You have to shift and adapt to the times.  You have to be more efficient in your thinking and approach.
While technology has made it easier for mediocre artists to surface it has also made it easier for great artists to surface.

Most photographers are shooting the same quality of work that was done in the days of film due to how easy digital technology has made it.  In the flooded market you have to do more to stick out.  The same attention to detail and work ethic is needed to be applied in the digital age as was found in the film days.  If you put the same amount of work into your craft you will rise above the rest.  The quality of work has to be amazing, blow people's minds!

(not saying I have learned how to do this or achieved this, its just an observation)

If you do what is stated above your work will need to be placed in the proper avenue or market.  In a frictionless environment that the internet gives us, our work can be seen by millions in a matter of days.  If someone likes your photo they will pass it on to those who will enjoy it as well.  Word gets around and the old principles of marketing still apply in the digital age, things have just changed a little bit.

So put the effort in, do better than the guy you are competing with and find the right market for your brilliance. 

Simple right?

Sunday, June 12, 2011

First Behind the Scenes Video

A few weeks I did a random shoot for fun with my friend Kyle.  The theme was Clark Kent and it came out pretty awesome.  We also did a bts video and there will be more videos of shoots in the future.


Wednesday, March 2, 2011

Change the art

If you are an artist of any kind and thats how you make a living, or that is how you wish to make a living, why is it that you chose such a career?

What it is for me is that art can inspire and change the world.  Just think of the picture of the student standing in front of the tank in Tianenmen Square.  There are countless images that have caused change in the world.

Tuesday, March 1, 2011

Creating a Watermark in Aperture

A necessary item to have in your photograph when placing it anywhere, print or web, is a watermark.  It helps brand your photography as well as deter people from stealing your photograph to use for their own gain.

If you are using Apple Aperture, it can be a little confusing how to do such a task.  But its not all that difficult in the end.


Friday, February 18, 2011

Via Request, New Color Setting Tutorial

I shared a few pictures online that used a new color setting and I received some really good feedback, even a few requests.  With that said, Im going to share this new color setting.


Thursday, February 17, 2011

Digital Workflow and Selective Desaturation in Aperture Tutorials

I felt ambitious and super productive today so I set out to make a new video tutorial on the digital workflow.  I also had to do a selective desaturation for a client and figured I would show its done while in Aperture.


Hope you enjoy them.  Let me know what you think.  

Sunday, February 13, 2011

First Video Tutorial

So I decided to jump on the bandwagon and start doing video tutorials.  They are so much easier to make compared to taking screen shots.  Here you can see how its done as I do it and I do a better job of explaining it as well.


Thursday, February 10, 2011

I Heart Stereo Shoot with BTS


John and Brandi are an awesome duo that make up the band i Heart Stereo.  I did a shoot for them last summer and it was time for another shoot for their new website and for other promo purposes.  They are nominated for a Grammy so make sure you tune in and check that out as well.

The shots they wanted were simple, just plain white back ground and black and white.  Simple enough so we headed to the location.  We didnt want to rent out a studio so we just used white dry-wall for the backdrop.  I used two Yongnuo YN-560 flashes for my lighting setup through most of the shoot.

Tuesday, February 8, 2011

Live Where You Are Inspired


I just recently moved into a new place here in LA and I love it.  Its exactly what I was looking for.  First off, its cheap rent and I get my own room.  Second, the place gives me plenty of inspiration.
To me, this is important.  If your surroundings let your flourish creatively then everything you do will be creative, at least it should.  When your living surroundings are creative, you will be constantly making new ideas.  Growth, its awesome.

Here are a few places...


Friday, February 4, 2011

Dance Fusion Shoot + critique

Last week I had a 4 hour shoot with the awesome Dance Fusion dance team.  There were some 30 people at this shoot ranging from the dancers to the mothers of the younger dancers.


Wednesday, January 26, 2011

Whatever makes you free.

So in a constant pursuit of trying to make my mark in the photography world, I always check out other people's work.  I end up getting into a mind set of try to do what they do.  Well on the surface this is great because you need to see what is working on the outside world of making a career of photography.  You wouldn't show a magazine photo editor a portfolio that has a bunch of work that has a style that they wouldn't use.  So yeah, you need to be showing work that they want to see, so study up people.

However........

Thursday, September 16, 2010

When Free is Bad.

Being a photographer or any artist is difficult, mostly due to the high availability of cheap equipment that anyone can afford.  It seems that any and everyone is a photographer these days.  

This is a discussion that is common among forum threads on photography websites.  It wasnt too long ago that photographers made really good money at their craft, that was until digital cameras showed up.

Usually in market places, the pro's would still do well because everyone knows good quality and thats what they want.  That is something that is quickly becoming untrue.  Clients will accept sub-par photos for the sake of meeting deadlines.

Another thing that has been true for decades is that doing free work when you start out helps boost your portfolio and gives you necessary skills which leads to great paying gigs in the future.  Skim through the creative gigs section in Craigslist and you will quickly see many potential clients looking for work but for free.  Usually its not simple work, its work that requires many hours at the computer to fit their high demands.  I know, because I have been there.

What does free work lead to these days?  More free work! YAY!!!!

However, free is not all that bad.  It has its place and its use in our society.  If it werent for free information then I wouldnt have been where I am today.  I have found that if you know how to find what you are looking for, then honestly why pay someone else to do it?  I am not a web-developer by any means, but I have built my own website from flash and HTML from just information I found on the internet.  I have pretty much learned everything I know about photography from various places and people on the internet (besides my own experimenting with the camera of course)

So is free all bad?  No I would say not at all.  In fact, I have had a change of heart and decided to start contributing and start helping people out that need it.  Your gut reaction is to ask for a fee to help someone with knowledge or experience that was forged in your own hard work.  However, when you get something for free, your usual reaction is to be more charitable, after all, freely you received so freely you should give right?  Yes, unless you are just a dick and dont want to share anything.

I have also discovered that the free exchange of ideas and speech propels our society like none other.  It creates a breeding ground for brilliant ideas to surface.

But what does that have to do with photography and doing free work?  Well, not much to be honest.  Its just the simple concept to help change your perspective perhaps.  Selfishness and greed will definitely not get you where you want to go, and you cant get where you are going all by yourself.

Friday, August 6, 2010

Latest shoot - Jason Taylor

Recently a friend sent me a message saying he has a friend who needs a shoot last minute.  I said sure go ahead and send him my way.  The next day we met up and headed to the Disney Concert Hall in downtown Los Angeles.

Jason Taylor has just finished up his album and I got a sneak peak of it as we finished up the artwork.  The album is called love Revolution and will rock your socks off.

Here are a few shots from the photo-shoot.


Friday, July 30, 2010

Puzzle Portrait Tutorial

I have a lot of people asking my how I made my puzzle portrait, so I thought I would give a tutorial.  Its pretty in-depth.  So here you go.

First off, I used photoshop CS5 in this tutorial.  When I made the original puzzle portrait, I used CS3, so you should be able to use any version you like, as long as it has the displacement filter.

What you will need is the picture that you want to turn into a puzzle and then some sort of picture of a puzzle.  What I did back in the day was put a puzzle together, flipped it over and then took a picture of the back of the puzzle.  Then I traced out a bunch of pieces.  Do not do this, it takes too long.  You can easily find a free graphic of a plain white puzzle on google.

Once you get your puzzle you will want to take out all that extra white-space, I did this while using Adobe Illustrator.  I did a live trace and took out all of the white in the picture.  I didnt think of this till the middle of this tutorial so you might notice the puzzle lines got thinner.  Anyways, here we go


Here is my image that Im using, I think it fits the mood well.  

The first step in doing a Displacement Map is that you have to prepare your image.

Go to Filter>Blur>Gaussian Blur.  Give your image a nice little blur, as you can see I used one about 8.4, you can go more or less if you want.  After that you need to desaturate your image or turn it into black and white.  Do a curves adjustment to give your image some contrast.

What this step does is setting up your map, soon you will see what Im talking about.  
After you are done with this, save it in a place you will remember, and save it as a PSD.

Ok, after this, what you need to do is import your puzzle.  For this I made three different layers.  One set for the face, one for the hands and one for the shoulders.  I also made them different sizes too.
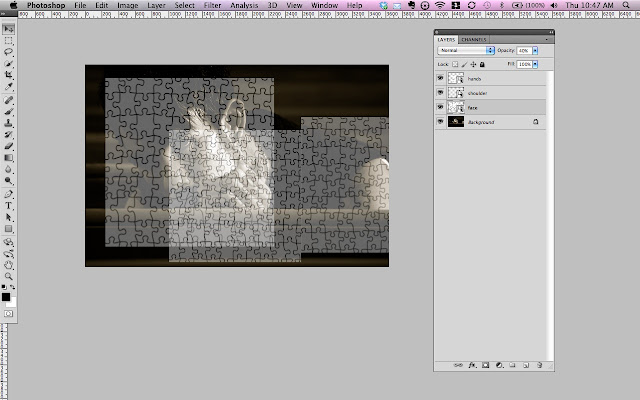


Ok after you have placed them where they need to, go ahead and turn off the layers of the ones you dont plan on mapping first.  For me I started mapping the face piece.  Go into Filter>Distort>Displace.  
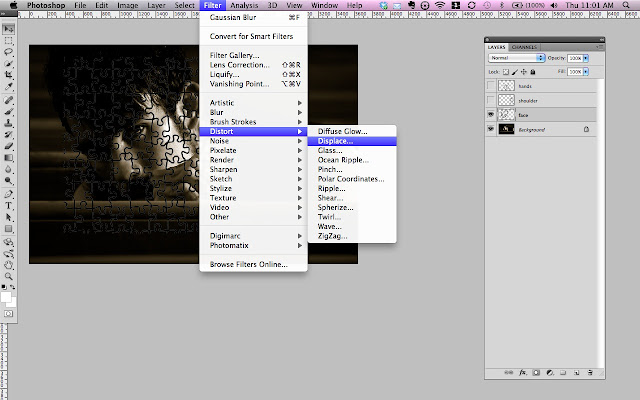


This is where it gets real tricky.


You will have to play with these numbers a bit till you get the mapping you want.  I stayed around the 15-25 range on each of pieces I did.  You should be pretty safe with this setup however.  After you hit ok, a dialogue window will popup asking for a picture, make sure you select that black and white image that is all blurred and nasty looking.  This image is going to be the indicator of the highs and lows of your mapping.


So now you have something that will probably look like this, its nothing fancy, not yet anyway.  It also might be a bit distorted too.  Dont worry, we will fix this.  Make sure you have your puzzle layers set to Multiply blending mode.


You are going to need to clean this up now.  Go through and delete the areas in the hair and sticking in the hand and whatnot.  
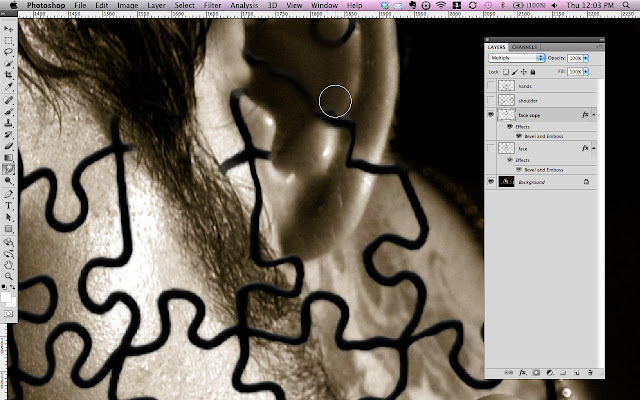


This is also the time where you will go in and use the liquify filter.  Its easy to find, go to Filter>Liquify. This is a whole new monster as well.  There is a little feature (at least on CS5) where you can see your background image.  You will zoom in and use a small brush to move small pieces in places.  This seems like a lot of work, and it is unless you have done this a whole lot.  But hey, its worth it in the end.

Also worth noting is that you might have to apply a soft erase brush to take away some of the areas just a little bit to add a fade.  You can also blur out some of the area where the picture is already out of focus, like the neck piece in this picture.  I dont think I did the best job on my example as I was in a hurry.

When you are done, you might have something similar to this...


Now lets get to the hands...


After erasing all the extra areas that didnt need to be used and did the Displacement Filter again, this is what I have.  Its ugly and has a lot of curves because of the way the hand is shaped.  So again, we go into our liquify filter and start playing around again.
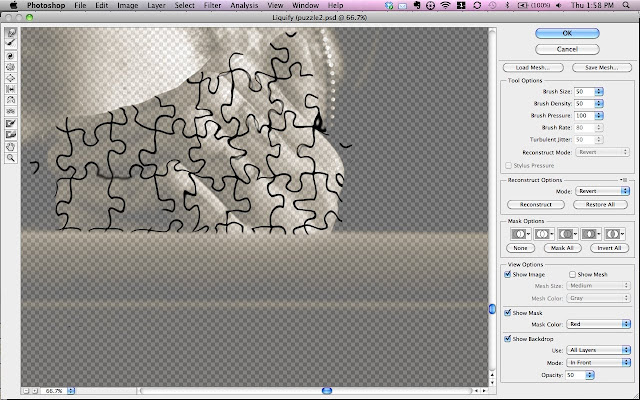


Here is where I was talking about using the liquify filter and have the background in there to better help us.  The box is located at the bottom right btw.  You will need to play with this a whole lot in order to get the desired looks.

this is about what you want it to look like in the end.
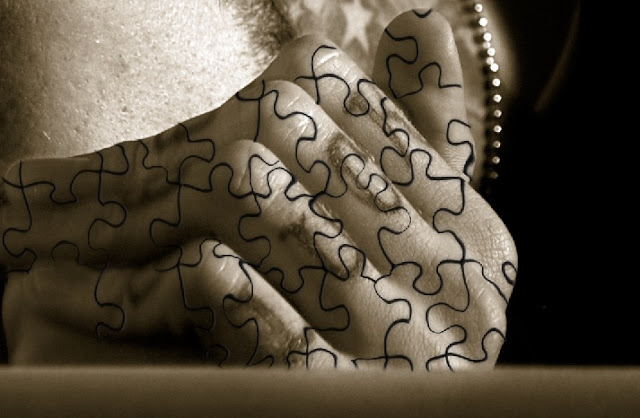


Again, I did a little blurring of the pieces and a little erasing in shadow areas.

After this, you want to do the shoulders, at this point its pretty easy.   So go ahead and do that.


Now this is the last part you will have to do.  In each of the puzzle layers, do a bevel emboss on the pieces.  Play around with the effect till you get the desired look.  Also remember to set your blending modes to Multiply.  

Now you will have something that looks similar to this in the end.
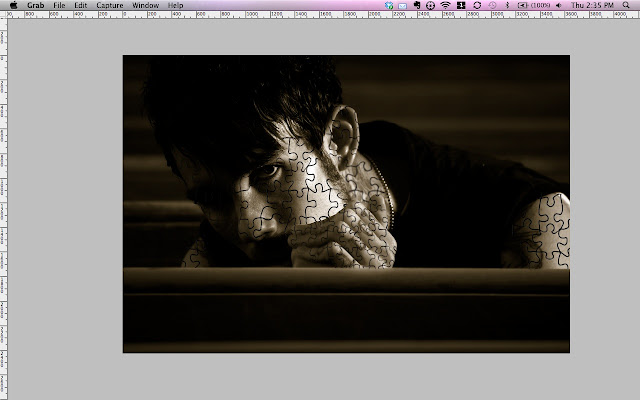


Let me know if you have any questions.


Monday, June 7, 2010

Garsteck Photography: Utilizing the strobist mentality.

A few months ago, I decided I would start getting lights for a future studio.  I looked more into this thing called "Strobist" and I was very intrigued by it.  I felt God tell me, "Pray for lights" and I said, "Ok" and I did.  And now, I have lights, well, a light.


I researched and priced out my initial strobist kit.  I already had a Canon 430 EX II strobe so I was good on that end.  All I needed to get was a: stand, sync cable or a wireless sync system, umbrella, and an adapter for my flash.  No big deal right?

Well I found a cheap and workable set on Amazon.com and now its all here and set up.  It works like a dream and I am pretty happy with it.


Along with said equipment, I also bought a tripod, new lens caps and a remote for my canon (to essentially use my bulb exposure).

whats the big deal with using off camera flashes?  They arent as powerful as a monolight strobe and they cost the same thing, if not more.  This is true, however, they are very portable and lightweight.  If I wanted to get a monolight kit, I would have to have portable power.  Care to guess how much they cost?  Yeah, a lot of money.

The strobist kits are way portable and lightweight.  Not to mention they allow you to get creative with your setups by allowing you to use less.

I plan on getting another light and stand and all that.  I will have a two light strobist kit eventually.  I also plan on getting a nice two light setup from Alien Bees.  They also have great wireless sync systems and I am looking forward to eventually replacing my $20 setup.

Thursday, December 17, 2009

Black and White.

Black and white is what I prefer to shoot in.  I want to show you a few bw photos that are a favorite of mine.

This shot was for a long exposure challenge that I placed 4th in.

This picture is taken inside of the Cotton Dock at Boone Hall Plantation in Mt. Pleasant SC.
 

 This is taken on a lucky foggy morning on Isle of Palms the day before my first art show.